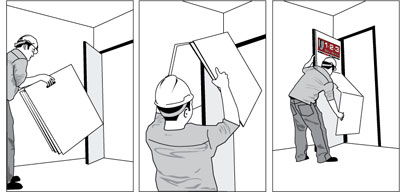
The illustration, which is included on every Door Shield, shows the easy installation of the 1-2-3 Door Shield® door protection system – no tools or special training are required. You can also view our installation video below, which describes 1-2-3 Door Shield® in greater detail and demonstrates the ease of installation and re-use.
Important: ensure that door is clean and dust-free before installing 1-2-3 Door Shield®
Start by removing the product from the storage carton and grasping 1-2-3 Door Shield® by its handholds. Then, simply separate the folded product slightly at the middle and raise it, using your forearms for leverage while centering the connecting “saddle” over the top of the door. Precise centering is important, as this will allow the door to be closed and secured once the 1-2-3 Door Shield® edge fasteners are in place.
Once centered, each side of 1-2-3 Door Shield® can be carefully unfolded
It may be necessary to lower one side, and then swing the door slightly to allow lowering of the opposite side. If door latch hardware has already been installed, 1-2-3 Door Shield® includes breakaway flaps to accommodate lever or thumb latch hardware. If latch hardware has not yet been installed, perforated hardware flaps will allow the hardware to be installed later without removing 1-2-3 Door Shield®. The perforated hardware flaps can be folded back or removed by the hardware installer.
When using 1-2-3 Door Shield® on a door with closer hardware, slit the saddle tape as needed from the hinge side and remove the perforated flaps at the top of the Door Shield. When adapting 1-2-3 Door Shield® for closer hardware, you can slit the saddle tape as much as half the door width from the hinge side without compromising the fit once the hook and loop fasteners are engaged.
Once both sides have been lowered, check again to ensure that 1-2-3 Door Shield® is centered on the door both horizontally and vertically
When properly installed, a gap of about 3/4″ will be visible on the hinge and strike edges of the Door Shield. This small gap will allow the door to be closed and secured without having to remove the Door Shield. Carefully and snugly secure the hook-and-loop edge fasteners on both the jamb and strike edges of the door. DO NOT OVER-TIGHTEN VELCRO STRAPS.
Installation is complete!